Normal paste CSS
I made this bundlrs to show everyone some basics on CSS for normal pastes!!! It's basically the same thing as its brother, /normalpaste on SNTRY but with a few tweaks to match the differences with bundlrs. Don’t try and use this to learn CSS, this is just for help with basic things specifically for styling your bundlrs page. If you really want to learn CSS I recommend W3schools or Mozilla.
some notes to remember:
- all code that can be found here must be put into style tags. Basically what that means is at the beginning of a code have
&!lt;style>and at the end of the code have&!lt;/style>. You only need one set of style tags where you can out all of the code in - probably the most pratical place to put your code is at the VERY top of your paste
- its REALLY useful to look at the default stylesheets of bundlrs!!:
https://bundlrs.cc/static/style.css
https://bundlrs.cc/static/css/fusion.css
https://bundlrs.cc/static/css/utility.css
https://bundlrs.cc/static/css/components/Code.css
https://bundlrs.cc/static/css/components/Input.css
https://bundlrs.cc/static/css/components/Navigation.css
https://bundlrs.cc/static/css/components/Animations.css
Sometimes if you’re struggling with making something work, it could be because of the default style. - always keep accessibility in mind!!! dont put super light colors against white, don’t put super dark colors against black, etc
Selectors
a selector is basically what you use to ‘select’ certain elements. One you might be familiar with is a, which you use to select all links. for example:
a {
  color: #ffffff;
}
but links arent the only thing you can customize!
Body selectors
body selects the part outside of the paste. basically the backdrop behind it, or technically the entire page. You can make it a custom color, image, gif, and whatnot.
main selects the entire paste, including buttons and all. NOT the same as body.
.tab-container selects just the main part of the paste. this is useful for applying a border, background, and such.
.editor-tab is exactly what it is in the name, it’s all the content of the page. this isnt that useful but you can use it to select only elements that are inside of the paste.
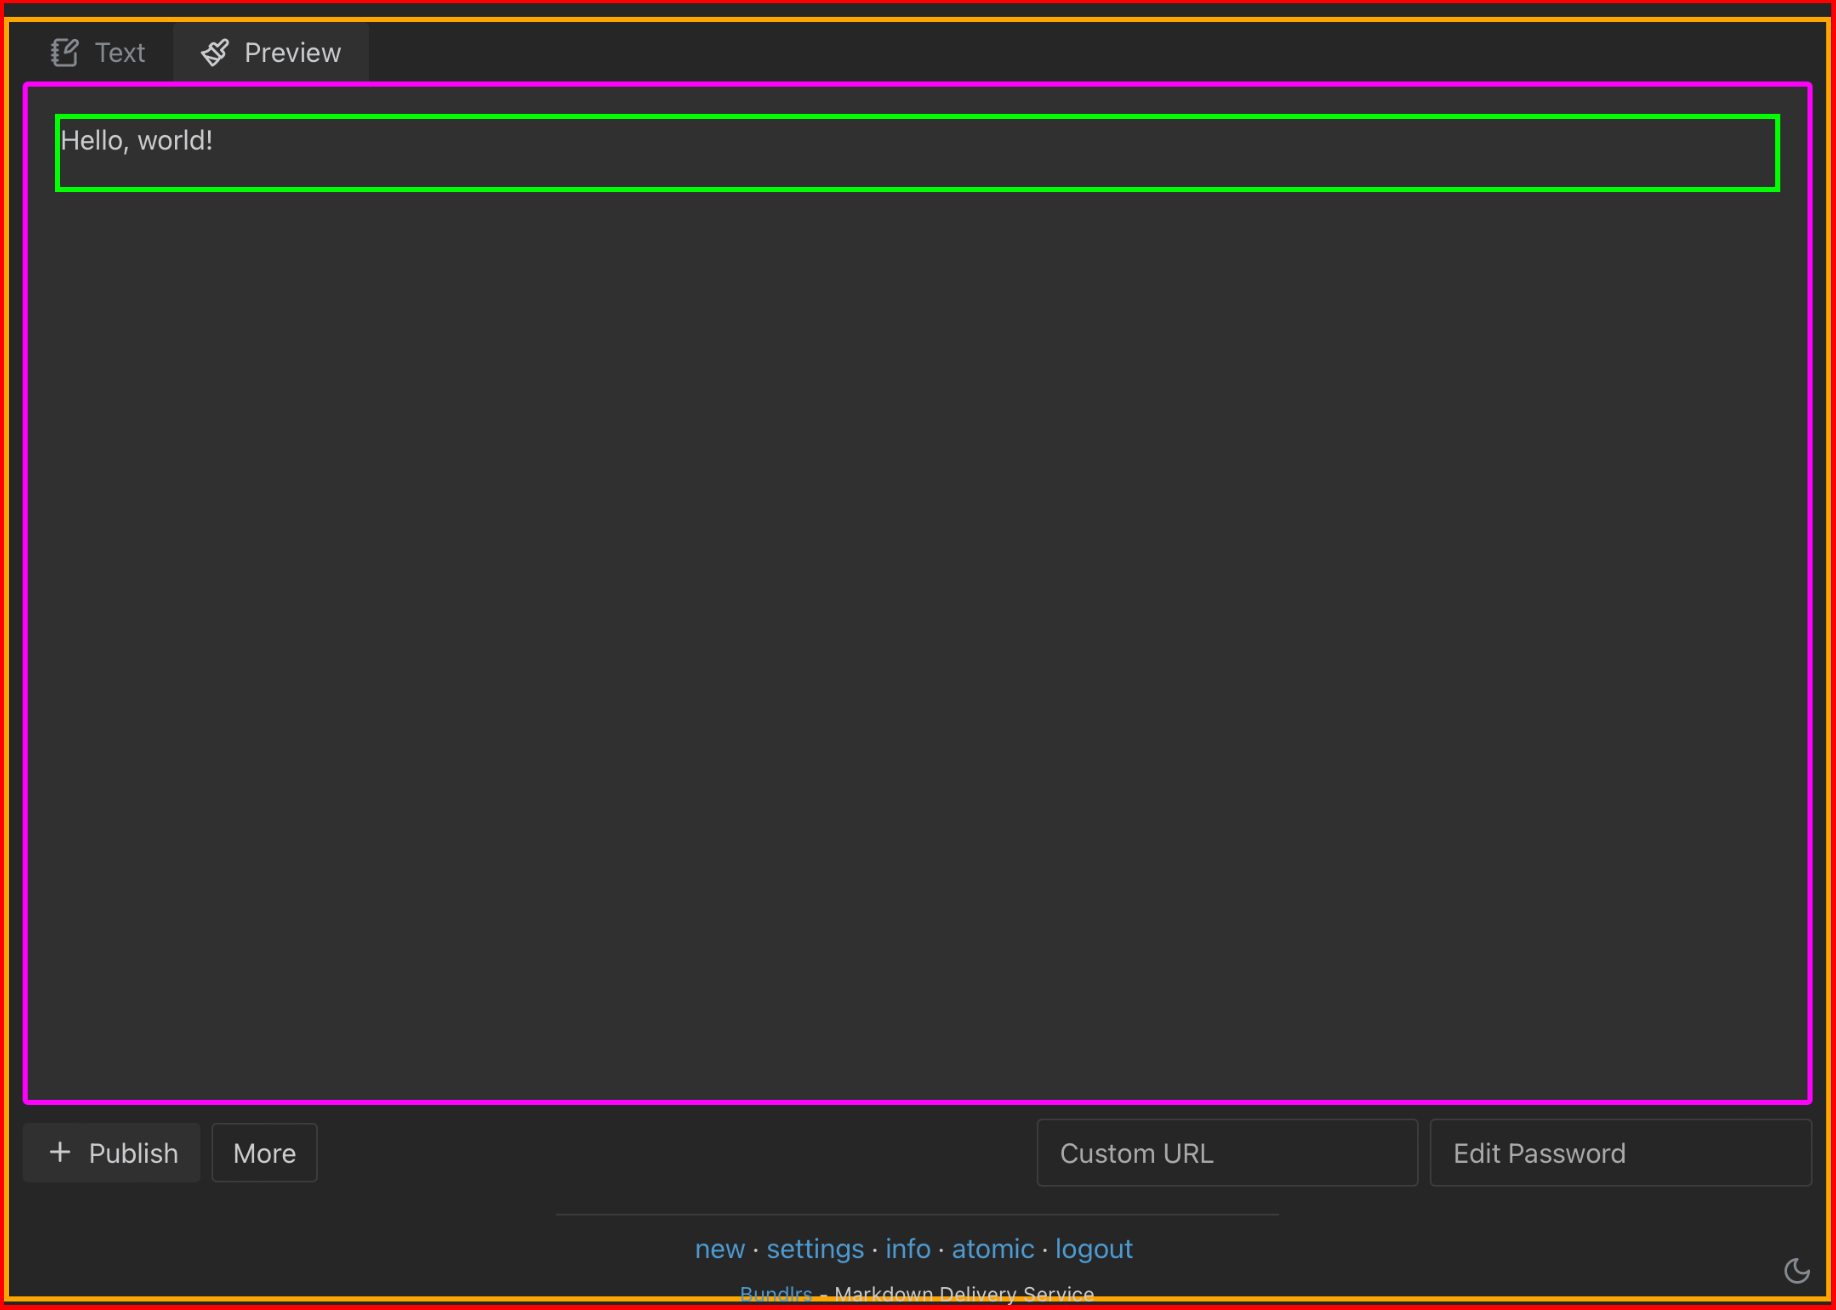
photo example:
outlined in red: body
outlined in orange: main
outlined in purple: .tab-container
outlined in green: .editor-tab

Text selectors
p selects all text in the paste.
a selects all links.
r selects anything that is aligned using arrows.
rf selects anything that is aligned using double headed arrows.
img selects all images.
strong selects all bold text.
em selects all italicized text.
h1, h2, h3, and so forth up to h6 select all different types of headers.
.highlight selects all highlighted text.
del selects all text with strikethrough.
code selects all single code blocks.
pre selects all fenced code blocks.
[role="animation"] selects all elements with animations.
[role="underline"] selects all underlined text.
.note-note, .note-info, .note-error, .note-warn select their corresponding admonitions. .mdnote selects all types of admonitions.
Pseudo classes and elements
if you want to get even more specific with what you select, you can use pseudo classes and pseudo elements. Pseudo classes allow you to select elements that are in a specific state, such as being hovered over. pseudo elements act as though you added a whole new element.
read more about pseudo-classes and pseudo-elements here (click me!)
Custom IDs and classes
Custom IDs and classes allow you to select objects by using a special ID/class that is applied to them. IDs should only be used for ONE element and one class can be applied to many elements. The names of IDs and classes can be whatever you want! You can set custom IDs and classes in normal pastes by doing the following:
for IDs
I have the ID ‘customid’ applied to me now!
HTML alternative:
I have the ID ‘customid’ applied to me now!!
you can replace div with any HTML tag you want to use
for classes
I have the class ‘customclass’ applied to me now!
HTML alternative:
I have the class ‘customclass’ applied to me now!
you can replace div with any HTML tag you want to use
How to use this
The way to declare something using CSS is like the following:
selector {
  property: value;
}
So, let’s say I want to make all my text with strikethrough blue.
del {
  color: blue;
}
To select IDs, you have to select it by putting a # and then the ID name.
#customid {
  color: #cfcfcf;
}
To select classes, you have to select it by putting a . and then the class name.
.customclass {
  color: #cfcfcf;
}
Some basic properties are color, which changes the color of text, border, which can be used to apply a border, margin, which is used to set margins, and many more. If you want to learn about more properties, I recommend you go through this (click me!)
Sometimes it might be necessary to put !important at the end of your value right before the semicolon. This overrides all other values of the same property that are applied to the selected object. To know when you need to use this, just check if your code works. If it doesn’t and you’re sure everything is correct, then try applying !important.
another important thing to learn about, combinator selectors (click me!)